Rain gardens are a useful—and beautiful—tool to help keep water systems healthy. These deceptively simple plantings filter runoff from impervious surfaces, conserve the resource and prevent the standing water that mosquitos use for breeding, all in an eye-catching display that can benefit birds and pollinators, too. According to the United States Department of Agriculture, a rain garden trap and process runoff 20 to 30 percent more efficiently than a lawn.
Recognizing the worth of rain gardens, homeowners in the Flathead Valley of northwestern Montana are using them to help preserve the region’s pristine rivers and lakes, especially in light of the area’s population boom.
“The growth in the Flathead is unprecedented,” notes Samantha Tappenbeck, a resource conservationist for the Flathead Conservation District. “We are in the fastest growing micropolitan in the nation.”
Indeed, this area, which enjoys the spectacular scenery of Glacier National Park, its surrounding mountain ranges and crystal-clear waterways, experienced 15-percent population growth in recent years. Conservation organizations and likeminded citizens realize that without proactive measures, their most precious resource is vulnerable to the increased pollution that can come with development.
In 2019, the Flathead Conservation District, with support from the Flathead Basin Commission and the city of Kalispell, rolled out the Flathead Rain Garden Initiative. It provides resources and supplemental funding for homeowners to create their own rain gardens. Tappenbeck reports that 15 individual gardens were completed in the past few years, and the district is working to grow the project.
Rain Garden Basics
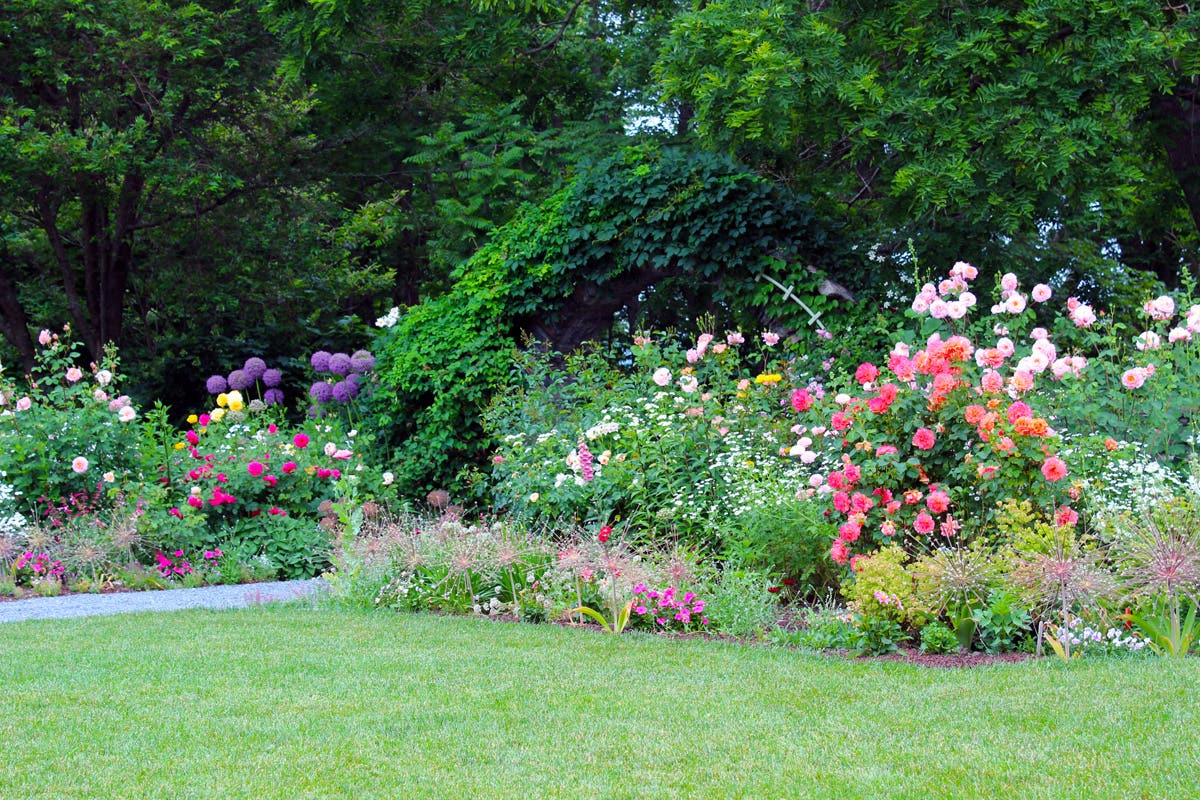
Generally, a rain garden is shaped as a basin. It is sited to collect water—and pollutants carried by it—from roofs or pavement before it can reach storm drains. Water runs inward from the top edges of the depression, traveling through grasses, forbs and shrubs before pooling in the bottom of the garden. From there it drains through the soil.
Because it exists to gather water, a rain garden’s location is key. Understanding the contours of your property is an important first step in creating one. Many resources recommend keeping the rain garden at least 10 feet away from a building’s foundation, especially if it has a cellar, and the area must slope away from the house. To gather water from the roof, a downspout can be connected to the garden by an aboveground extender or a buried pipe. Siting the garden adjacent to sidewalks, roadways or drives will collect the runoff from those surfaces.
Because the garden is constructed to pool water within it, keep it 25 feet from well heads and septic drain fields. As with any landscaping project that requires digging, check utility-line locations before the first shovel goes into the ground. (In the United States, call 811 to schedule free, professional utility-line marking by Dig Safe.)
Full sun is the best location for most rain-garden plants, but they can be designed for shaded locations. Experts also often recommended keeping this garden away from large trees, which can make construction and establishment difficult. Becky Groose, a new Kalispell gardener who wanted to be part of her community’s effort, says the mature spruce in her front yard did prove a challenge.
“It took a good day of labor to work around the roots,” she says. Several volunteers and friends helped her dig down more a foot. They mixed in compost and other amendments before planting. “The plantings are small but thriving,” she reports.
Rain Garden Design
Creating a rain garden differs from making a traditional perennial bed because of the research and testing required for it to function as intended. Be ready for a little math.
First determine the size of the rain garden by calculating the size of the impervious surfaces that will feed it water. Measure and combine the square footage of the driveway, sidewalks and roof sections that will connect to the garden. As a general rule, the rain garden’s area should equal approximately 20 to 30 percent of this figure.
In many cases, the equation results in a small garden. But this doesn’t detract from its usefulness, explains Hailey Moore, nursery manager at the Center for Native Plants in Whitefish, pointing out that a rain garden can be as big or as small as it needs to be.
Shannon Freix’s tiny triangular garden is the perfect example. Smaller than 200 square feet in area, it fills the space hemmed by a small shed and two concrete walkways. In winter, she shovels the snow from these sidewalks onto the garden, and more slides off the roof of the shed.
“That’s the last spot to melt out in the spring,” she says, describing the depth of the snow pile. Yet the little garden is able to absorb all the snowmelt.
The next step is a percolation test to calculate the time required for water to drain. Remove any sod and dig a hole 12 inches deep. Fill it with water and note the time. If it completely drains within 12 to 24 hours, the soil offers an adequate percolation rate for a garden that will be 6 to 9 inches deep. If water remains after 24 hours, it will be necessary to dig the garden deeper and replace the heavy clay with materials higher in organic matter.
With the garden’s size and depth determined, it’s time to lay out the design. Use a non-toxic spray paint to mark the shape or simply outline the perimeter with a garden hose. Then run lines of strings to mark various depths to dig to. Because the basin shape is crucial to the functionality of this type of garden, it’s important to dig to the full desired depth, then slope upward, creating three planting zones within the design.
“The lowest point—zone one—is designed to be submerged during those rain events,” explains Moore. “In zones two and three, you want kind-of drought-tolerant species.” Zone two can harbor plants that grow well with more moisture, because it is closer to the water-capture area. The third zone, which sits at the edge of the depression, focuses on more drought-resistant plants.
With the outline made, the easy part is over. It’s time to dig and prepare for planting. As any gardener knows, removing sod is often a challenging endeavor. Excavating anywhere from six to twelve inches (or deeper) makes for an excellent workout! When adding plants, mix in compost or topsoil as you backfill their planting holes to improve the soil conditions.
Rain Garden Plants and Upkeep
The best planting choices for the rain garden are native species or selections that are acclimated to the region. For example, Moore notes that the Flathead Valley experiences cool, wet springs followed by hot, dry summers. On top of it, winter temperatures occasionally plummet to the negative double digits.
“We want to set people up for success,” Moore says of the preference toward native plants. She also notes that by using plants endemic to the area, the rain garden can supply resources for birds and other wildlife.
While concentrating on native plants, include grasses, ground covers, sedges and forbs, along with trees and shrubs where spaces allows, to provide diversity and interest.
“It’s okay to start small. You can start with seeds or start with small plants,” Groose suggests. She mentions that one of her favorite additions to her rain garden is blue flax (Linum lewisii), which she notes readily reseeds.
As with any garden, even those planted with native varieties, there is a certain level of maintenance for a rain garden.
“The weeding is important to keep up,” says Groose. “For me, it takes a couple of hours once a month. I get a little stool or sit on a bucket and clean it up.” But weeds aren’t the only plants that thrive.
“I think for some of the homeowners, the biggest challenge is the rain gardens are doing too well,” says Moore about the Kalispell initiative. As a result, they’ve found that increasing the space between plants reduces overcrowding. For instance, instead of planting a recommended 12 to 18 inches on center they’ll go 24 to 36 inches, particularly if the species has been shown to grow large in the local rain gardens. This has been the case for columbine (Aquilegia canadensis), for instance.
“The columbine went bonkers,” says Freix. “They’re almost as tall as me.” Usually, she likes leaving seed heads for the birds, but she chose to cut back some of these plants to reduce reseeding. It boils down to observing the plants’ behavior in the garden and adjusting the maintenance routine to match.
The Benefits of a Rain Garden
Most of the Flathead participants are driven to participate out of a desire to do a small part in preserving the valuable water resources of the region. When we consider how much water runs down a roof or over driveways and sidewalks, gathering pesticides and other pollutants, it’s heartening to have this simple garden design to turn to. By mitigating non-point source pollution (as this type of runoff is called), the residents are hoping to avoid problems like algae blooms that occur in other regional lakes.
“We are just stewards of the land,” says Groose.
Moore adds, “We think about the overall impact and the change that is happening.”
For Freix, it hits close to home: “I spend a ton of time on the water. This is just a small way to keep our water ecosystems clean.”
And there are surprising additional perks for the home gardeners. Groose lives close to an elementary school; she loves watching classes stop by her garden while the teacher explains the plantings. If the lessons land well, these students might install their own rain gardens in the future.
She also enjoys the birds and insect pollinators that use the space.
“Every morning there were new blooms and butterflies,” she recalls of the garden’s early days.
Lastly, it’s a plus that these gardens require little to no supplemental water—and they’re another spot that doesn’t require mowing.
Image credits: Illustration by Doug Adamson,RDG Planning & Design/USDA NRCS; Others courtesy of Flathead Rain Garden Initiative